How to Start Cold Plunging: The First 30 Days
The biggest mistake beginners make is buying first. A tub arrives, the novelty carries them through a week of too-cold, too-long sessions, and by week three it's a very expensive planter. The second biggest mistake is starting at 45°F because some guy on Instagram does. Cold tolerance is trainable, and the training is free. Here's the 30-day version.
Before day one: read the safety page. If you have a heart condition, blood pressure issues, or are pregnant, this practice is not for you until a doctor says otherwise. That's not a legal formality. Cold shock is a real cardiovascular event.
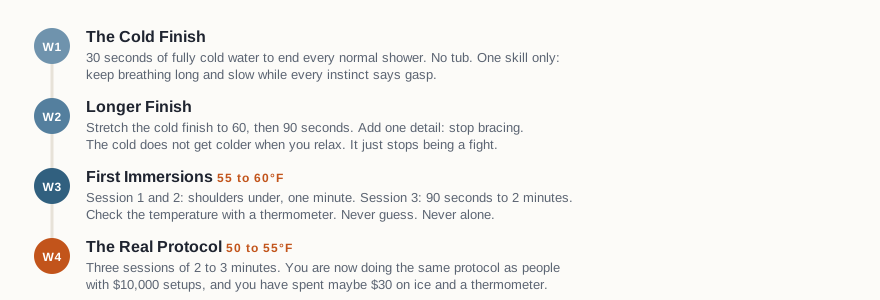
Week 1: The Cold Finish (shower only)
End every normal shower with 30 seconds of fully cold water. Not lukewarm. As cold as your tap goes. Your job for week one is a single skill: keep your breathing long and slow while every instinct says gasp. In through the nose for four counts, out for six or eight. The gasp reflex peaks in the first 10 to 15 seconds, then fades. Once you've felt it fade a few times, the fear loses most of its teeth.
Skip the Wim Hof style breath-work before cold exposure. Hyperventilating before immersion is how strong swimmers drown, and it adds nothing you need. Calm breathing in the cold is the entire skill.
Week 2: Longer Finish
Stretch the cold finish to 60, then 90 seconds. Add one detail: stop bracing. Drop your shoulders, unclench your jaw, let the water hit your chest and back. The cold does not get colder when you relax. It just stops being a fight. When 90 seconds feels routine rather than heroic, you're ready for immersion.
Week 3: First Immersions
You need something that holds water and a cheap thermometer. A bathtub with cold tap water plus a couple of bags of ice works. So does a $120 insulated tub. What the water should be: 55 to 60°F. Check it with a thermometer, don't guess. Tap-cold alone in summer often sits at 70°F+, which is a tepid bath, not a plunge.
- Session 1 and 2: in to the waist, then to the shoulders. One minute. Hands out of the water if it helps, they're full of cold receptors and they scream the loudest.
- Session 3: 90 seconds to 2 minutes, shoulders under, breathing slow.
- Always: someone home and aware you're in the water. Phone within reach, outside the tub.
Week 4: The Real Protocol
Three sessions of 2 to 3 minutes at 50 to 55°F. That's it. You are now doing the same protocol as people with $10,000 setups, and you've spent maybe $30 on ice and a thermometer. From here, the main protocol page covers progression, and the weekly dose to settle into: roughly 11 total minutes across 2 to 4 sessions.
What the First Session Actually Feels Like
Seconds 0 to 15: involuntary gasping, a spike of adrenaline, and a loud internal voice with one strong opinion. Seconds 15 to 45: breathing comes back under control if you let it. Minute 1 to 2: the burn fades into a heavy, dull cold, and a strange calm shows up. Getting out: skin-level pain stops almost immediately, then 5 to 15 minutes of feeling sharper and better than the situation justifies. That afterglow is the dopamine and norepinephrine response, and it's the most reliable effect in the entire research record.
You'll also shiver after, sometimes a lot. That's the rewarming process working, and per the Søberg principle, you want it: end cold, skip the immediate hot shower, and let the shiver do its job. Put on dry clothes and move around instead.
Mistakes That End the Habit
- Too cold, too soon. 39°F water on day one builds dread, not adaptation. Dread kills consistency, and consistency is the entire game.
- Too long. Past 5 minutes you're adding risk and shiver-time, not benefit. The dose is small. Respect that it's small.
- Chasing numbers down. Each degree colder buys you nothing except bragging rights. The protocol window is 50 to 59°F. Stay in it.
- Plunging right after lifting. It blunts the muscle growth you just trained for. Details on the timing page.
- Buying a chiller before you have the habit. Thirty days of ice and a cheap tub will tell you if this is your practice. Then read the chiller math.
After the 30 Days
If you've made it a month and you want a permanent setup, you have three sane paths: stay nearly free with a budget setup, buy a mid-range barrel or tub, or go all-in with a chilled system. The gear guide compares all three tiers with current prices.
Get the printable one-page protocol
Temps, times, weekly dose, the full progression ladder, and the safety rules on one sheet. Print it and put it where the water is.
Download the protocol PDF